|
看到ThingJS 物联网3D可视化开发实战,里边讲述了Thingjs与DataV的简单结合,但是没有说到ThingJS的两者之间交互,于是我开始研究了一下两者之间的交互问题。
DataV可以让非专业的工程师通过图形化的界面轻松搭建具有专业水准的可视化应用。而ThingJS则是搭建3D可视化应用,结合这两者从而能够给千篇一律的数据大屏加点料! DataV与ThingJS的结合方法首先在自己DataV项目下,同过iframe组件引入ThingJS项目。如下图,这样ThingJS场景就可以成功的嵌入DataV中啦。 
DataV与ThingJS交互 首先我们需要DataV中找到我们需要的可交互的组件,这里我们选择用的是饼图。如下图,框选部分是数据源部分。根据提供的数据源就可以生成我们需要的饼图啦。 

在饼图组件中启动交互事件,当点击饼图时,绑定的变量就可以通过DataV的回调ID机制,在其他组件中使用。 
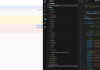
下边是其他组件使用回调ID,将当前值通过接口方式传递到后台服务器,这样ThingJS中就可以实时的使用这些数据啦,从而实现了ThingJS和DataV的交互。 
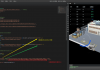
ThingJS官方教程下的数据中有多种获取数据的方式,这里使用了最简单ajax定时刷新数据,通过这些变化的数据就可以控制3D场景中各种物体的展现效果了。 
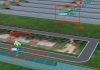
如下图,当点击左边饼图中的警车时,就可以3D场景中的看到所有的警车啦,这样就完成了DataV与ThingJS的数据交互啦。 
以上是通过后台进行交互的,在研究过程中试着通过前台直接交互,但是由于每一数据改变都会导致重新加载场景。希望后边有机会可以解决这个问题。 |